How to Set Up an Email Provider and Collect Email Addresses in Squarespace
You’ve probably already heard that having an email list for your business is an important piece of your business strategy. It helps you continue to engage and build your community, and it’s also a great place to make sales to a warm audience.
In this article, I’ll show you how to connect your email service provider to Squarespace so you can start gathering addresses and building that email list!
Whether you're using Squarespace's native email campaigns or a third-party provider like MailChimp, ConvertKit, FloDesk, etc., it’s a fairly straightforward process.
I’ll walk you through step-by-step how to do this below, but if you prefer to watch and learn, please feel free to watch the companion video on YouTube.
Quick note: I’ve included some screenshots below for major steps along the way, but not for every detailed step. If you prefer that level of detail, I encourage you to refer to the video!
Option 1: If you are using Squarespace campaigns or MailChimp
If you are using Squarespace’s native email marketing campaigns, MailChimp, or want to send email addresses via Zapier or to a file in Google Drive, you're going to use the newsletter block.
Start by logging in and navigating to the page and section where you want to place your form for gathering email addresses.
To add a Newsletter block:

Click on ‘Add a block’
Select ‘Newsletter’
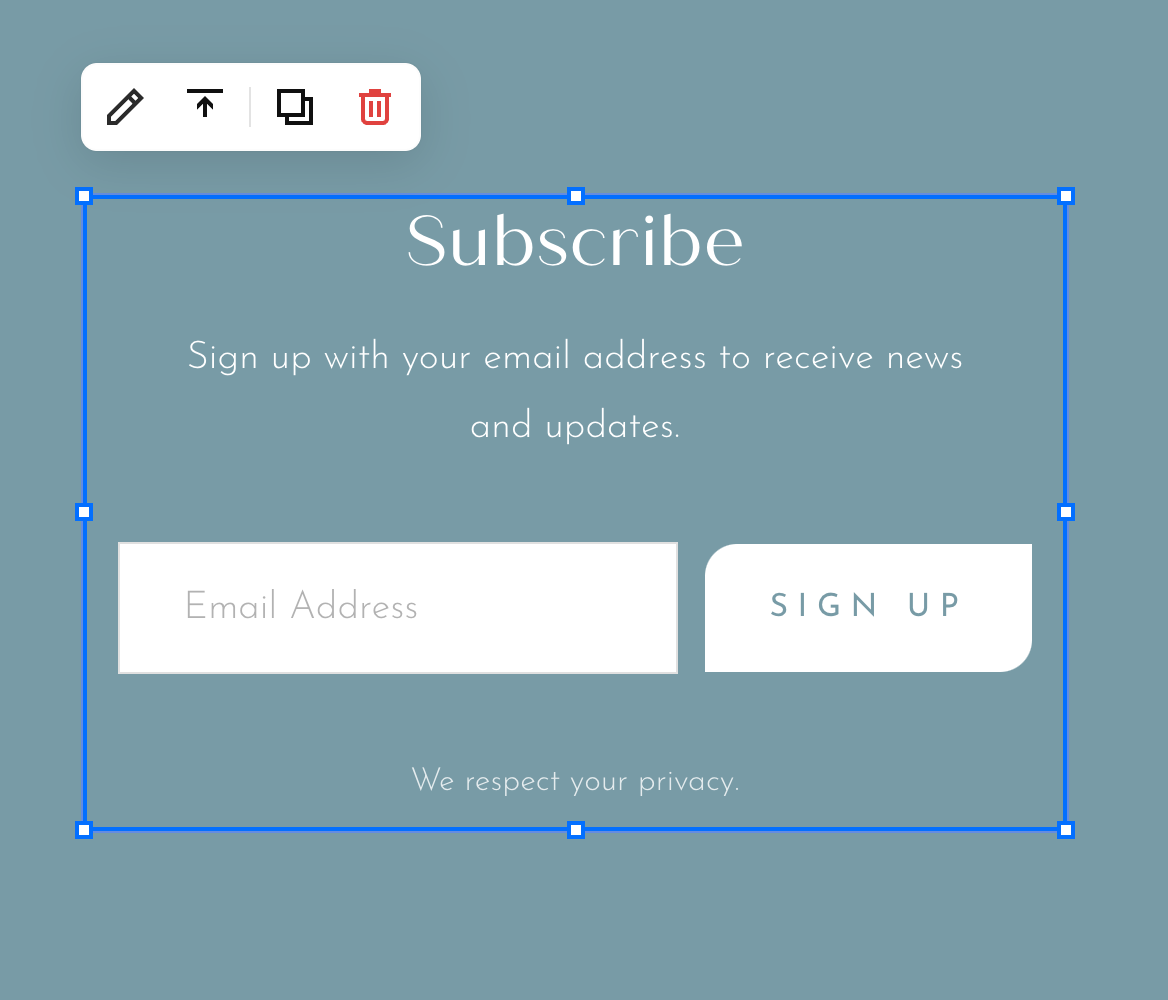
That will create a block automatically populated with some information by default.
Basic text like ‘Subscribe’ and ‘Sign up with your email address’
Boxes for the name and email address
A sign-up button
Basic disclaimer text below it
This can all be edited! Here’s how:

In the pop up box, go to the fields with the text you want to change and type in what you want it to say.
You can change the text for your Title, Description, Disclaimer, and Button.
You can edit the form fields that are included too. You can add a name field. You can also set that as required.
You can also edit what message they are shown after they submit their address. It could be a message that says, ‘Thanks for signing up!’ or you could redirect them to a different page. Whatever you want, it can all be edited in this spot.
So now you have the content set. What about how it looks?
How to Design the Newsletter Block
Click on the ‘Design’ tab of the pop-up window.
You can choose to have your block ‘float’, which automatically adjusts the fields based on the size and space you place the block.
Choosing ‘stacked’, will stack the block fields vertically.
Toggling on ‘background’ will set the block with a colored background based on the colors selected for the section you are in.
You can also format the corners to make them rounder, adjust the padding, etc. Play around with it until you get the look you want!

Once you’ve got your block formatted to your liking, it’s time to connect it to your email service!
How to Connect Your Email Service Provider in a Newsletter Block
To connect your email provider you need to click on the tab that says ‘Storage’. This is where you will tell the form where you want the email addresses to be stored.
When you're using the newsletter block, you have the following storage options:

Squarespace email campaigns. Click that and select the pertinent settings, or
‘Other Options’
Under ‘Other Options’ you have three choices.

MailChimp
Zapier
Google Drive
If you use MailChimp, this is where you’ll select that and follow the prompts to connect to your account.
If you prefer to use Zapier to send email address data to your email provider, you’ll connect your account here.
Finally, you have the option to connect to Google Drive and send the information to a file in your Google Drive.
Those are the native or ‘built-in’ options you have to choose from using a newsletter block.
But what if you are using a third-party provider, a different email service provider?
Perhaps you use Active Campaign, Mailer Lite, or, in my case, I like to use Flow Desk or ConvertKit. How would you connect those?
Option 2: How To Connect to a Third-Party Email Service Provider
When there's not a native connection or integration available, you need to get a little bit more creative, but it's easy.
Most of your major email service providers will have the ability for you to grab a link or get a piece of code for your collection form and allow you to drop that into Squarespace.
Before moving forward, you’ll need to create your collection form or landing page in your email service provider’s software. Then you can move on to connecting it in Squarespace.
HOW TO COPY CODE TO CONNECT YOUR EMAIL PROVIDER
First, you’re going to add a block, but in this case, you’re not going to use a newsletter block.

You’re going to add a code block.
You’ll see it populates with ‘Hello World!’ That's the default.
To edit the block, select the pencil icon and a pop-up box will open. You’ll see the ‘Hello World’ code in there; simply delete that.


Now copy the code from your email provider in this space. (I’ve copied code from one of my ConvertKit forms here as an example).
Close this box and then hit ‘save’ on your page (upper left corner) to exit out of edit mode and you'll see the form show up on your page!
You'll notice that when you're in edit mode, it's not going to show the form. You’ll see the box with ‘Script Disabled’ in it. Don't let that concern you! You just need to hit save to publish your changes, and then it'll show up.
Now you can play around with the size and position of your block, but you're not going to be able to do much more than that because you're copying and pasting code and the formatting that is embedded within it.
You can put this block in any section of your site or even in your footer, which is a popular spot as well!
Now you can test it out by submitting a test email and ensuring it’s working as you like.
What if you don’t want to connect a simple form like this, but would rather send people to a landing or sign-up page you have created with your email provider?
The simplest way to do this is by using a link. You can do this in a line of text, but if you really want to call attention to it why not use a button?
HOW TO LINK TO AN EMAIL LANDING PAGE USING A BUTTON
Quick and easy, here’s how to do it:
In the section you want the button select ‘Add a Block’
Select a ‘Button’ block
Position the button where you want it and then click the edit pencil
Edit the text for the button and make any other format changes you want.
Click the settings wheel
In this box, go to ‘Web Address’ and paste in the link to the landing page you want it to go to.
Hit Save
Test it to make sure it works as you planned.


You did it!
Congratulations! You’re now on your way to building your email list with ease! And if you're just getting started and aren’t sure which email service provider is right for you, I highly recommend the providers listed below. I use them, and they're great for wellness businesses. They’re easy to learn and set up, work well with Squarespace.