5 Powerful Squarespace Images Tips | Complete Beginner Guide
Clean, fast, and consistent visuals make your site feel professional. If your Squarespace images are blurry, slow to load, or hard to manage, you’ll feel it in your bounce rate, and your SEO, not to mention your sanity! Here are five powerful yet simple and practical tips to help you get crisp images, faster pages, and a smoother workflow, plus a quick bonus idea to spark your creativity.
I’ll walk you through all the tips, but if you prefer watching a tutorial, be sure to view the companion video on my YouTube channel.
Tip 1: Choose the Best Format and Sizes for Squarespace Images
Start with high-quality images you have that offer strong image resolution and appropriate image dimensions, then optimize your images for the web. Use the formats Squarespace handles well: JPEG, PNG, or WebP. WebP is often the sweet spot because it produces smaller, high-quality files, and Squarespace now supports it. That usually means you can maintain image clarity without bulky file sizes.
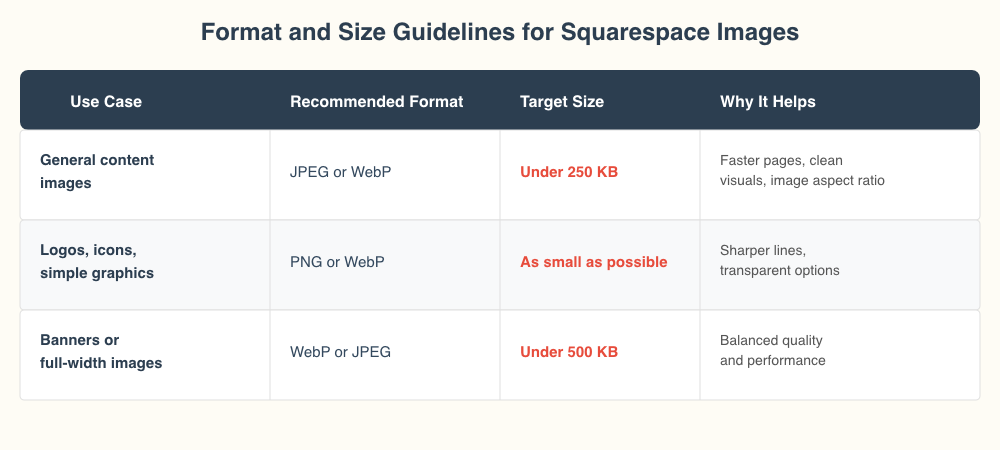
As a rule of thumb, keep image file sizes small:
General site images: aim for under 250 KB whenever possible.
Large, full-width, banner images, or banner-style images: keep them under 500 KB.
This is guidance, not a hard law. You may need to make judgment calls to protect quality, especially for hero images or detailed photos. That said, converting to WebP usually helps you hit the sweet spot between quality and speed, while smaller file sizes improve page load speed, which is helpful for SEO optimization.
If you want a broader perspective on how images support your site overall, including sourcing and consistency, take a look at this article on the strategic use of images in web design. It pairs nicely with the technical tips below.
Tools for Compressing and Converting Images
You do not need a heavy design suite to optimize your images. Here are easy, free options:
For Mac users: Right-click any image in Finder, select Quick Actions, then convert between JPEG and PNG. You cannot convert to WebP with this built-in option. Simple built-in tool for quick changes.
Web-based tool: Use Squoosh for fast resizing, cropping images, and side-by-side quality previews. Drag in your image, tweak the size and compression, preview with the slider, then download.
Favorite bulk tool: PixResize by SquareStylist lets you resize, convert to jpg, png, and webp, and process images in bulk. It is straightforward, fast, and includes a short tutorial.
Extra time-saver: If you use SEOSpace, you can scan your site for oversized images and compress flagged files right there.
Here is a quick reference you can save:
Deep Dive Resources
If you want to nerd out on pixel sizes, how Squarespace works with different image file types, and what really happens behind the scenes, watch this detailed explainer by Katelyn Dekle. It is a great complement to these quick-start tips.
Tip 2: Master Alt Text for SEO and Accessibility
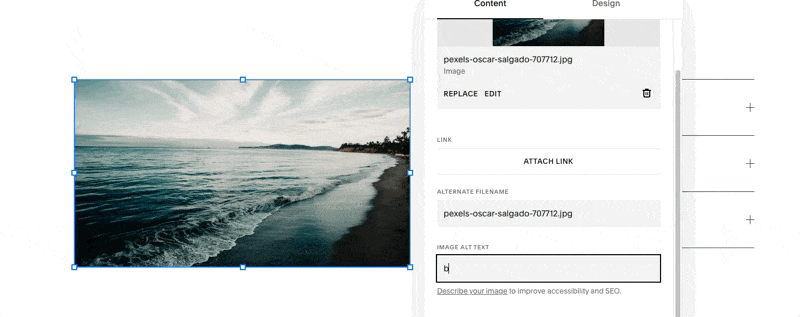
Alt text does double duty. It helps with SEO by describing the image content to search engines, and it improves accessibility for people using screen readers. Keep it short, accurate, and helpful. Describe what is in the image and what matters about it in context.
Pro Tip for Saving Alt Text
When you add alt text directly inside an image block, there is a small quirk that can trip you up. Follow this process to make sure your edits stick:
Open the image block editor.
Type your alt text into the field.
Click outside the image block, somewhere else on the page, to close the block and trigger the save.
Avoid pressing Enter or Save while your cursor is still inside the field. It sometimes fails to apply, which can be frustrating. A quick scan with SEOSpace after you finish edits can confirm nothing went missing.
This small habit saves heartache later.
Common Pitfalls to Avoid
This save trick applies to image blocks you edit directly. If you are using Squarespace’s built-in SEO tools to manage alt text, you will follow that tool’s flow instead.
Tip 3: Keep Text and Images Separate
Resist the urge to upload a Squarespace images that already has text baked into them. Use separate text blocks layered with image blocks to get the look you want. It is a small change that solves big problems.
Why it matters:
Your design adapts better to different screen sizes and image layouts. Text stays readable on mobile instead of shrinking or getting cropped.
Search engines can read your headings and content, which supports your SEO.
You can edit text later without recreating graphics.
How to Layer Effectively
Squarespace makes layering simple, especially when using the Fluid Engine editor. For instance, when working with a Section background image, this layering technique is necessary to maintain flexibility. Use an image block as your background, then add a text block on top. Adjust placement, font size, and contrast so it is readable on both desktop and mobile.
Benefits you will notice:
Better responsiveness across devices.
Easier editing without opening a design tool.
Layering adds a clean, professional polish without headaches.
For a full walkthrough of this concept with visuals and examples, check out this guide on why embedding text in images hurts SEO and user experience.
Tip 4: Use Descriptive Image File Names
Your future self will thank you for tidy file names. Skip the random strings of letters and numbers that pile up over time.
Avoid: IMG_1234.jpg; Use: homepage-banner-sunset.jpg
A clear, descriptive name helps you search, identify the right file, and keep your asset library manageable as your site grows.
Best Practices for Naming
Use simple, consistent patterns for your image file name:
Include what the image shows, where it belongs, or its purpose, like the page or section.
Keep it short and clear so you can scan it quickly.
Rename files before you upload them to Squarespace for the cleanest workflow.
This small habit saves time when you need to swap an image, build a new page, or clean up your library later.
Tip 5: Organize Your Asset Library
Squarespace images build up fast. A clean asset library makes your site easier to maintain, whether you are adding new content or doing a seasonal refresh. The benefit is simple: an easier life down the road.
Trust me. I know of what I speak! I’ve been designing Squarespace websites long before folders were available. It wasn’t pretty.
Not sure where to start? This walk-through shows the core features and how to make folders work for you: Squarespace asset library for image management.
Using Folders in Squarespace
Folders keep your library clean and make uploads less chaotic. Build a structure that matches how you think and work; this structure is vital for grouping content, like in Gallery Sections.
Open your site’s asset library.
Create folders to group related images.
Upload and sort images into logical categories that you will remember.
Helpful examples:
Blog Images
Product Photos
Homepage Banners
Testimonial Headshots
Gallery Images
This also helps if you bring in a designer later. A tidy library speeds up their work and makes it easier to keep your site consistent.
Cleanup Habits
Set a recurring reminder to review and delete unused images. A tidy library helps maintain overall image consistency across the site, keeping things lean and saving you from digging through clutter.
Bonus Tip: Have Fun With Your Images
You deserve some creative playtime. Images can do more than fill space. Try playing with different shapes, layering photos with colored shape blocks, experimenting with text overlays, or adding subtle image effects that match your brand. These image editing endeavors keep it clean and inviting, but do not be afraid to try something new. It’s not all about file sizes and image optimization for SEO.
Enjoy the process!
Ideas for Experimentation
Layer images with image shapes for simple color overlays.
Use subtle effects to add personality without stealing focus from your content.
If you want a step-by-step tutorial on design effects, let me know. If enough folks are curious, I will put a video together.
Wrapping Up
Small improvements go a long way towards effective image optimization. Choose the right formats, manage the file size of your images, write helpful alt text, separate your text from images, and keep your library organized. These habits make your Squarespace images look better, load faster, and work harder for you. If you want to go deeper into file organization, revisit the tutorial on Squarespace’s asset library features, and for SEO and UX, this reminder about why image text hurts your site’s performance is a must-read. Have fun experimenting, and build a site that feels simple to manage and easy to love.
You may also find these articles helpful: