
Squarespace Tutorial: How to Add a Promotional Pop-Up and Announcement Bar
In this article, I'll show you how to take advantage of the built-in announcement bar and promotional popup functionality on your Squarespace 7.1 website.
🧩Here's a hint... they're not just for collecting emails!
Heads up! This is a long-ish article with many simple steps.
I’m giving you all the detail you need to get up and running fast, but if you prefer to watch and learn, I’ve got you covered!
You can hop on over to my YouTube channel to view the companion video any time if you want to see the process in action!
Overview of Pop-ups and Announcement Bars
If you're a Squarespace beginner, you might not be aware of their built-in functionality for promotional pop-ups and announcement bars.
Even if you are slightly familiar, maybe you're not using them to their full advantage. These are simple and easy-to-use marketing tools to help you promote anything you need on your website.
📩 Your email list.
📰 Your newsletter.
🛍️ A sale.
🎉 An event.
Any special message that you want to have loud and out there on your website grabbing your visitors’ attention.
It doesn’t require any special skills or software and you can add one in minutes.

How to Add and Style an Announcement Bar
(note: as of this writing, these two marketing tools are only available for business plans and above, so you may not be able to use them on a personal plan).
Go to your main navigation menu
Select ‘ Marketing’

3. About halfway down, you’ll see ‘Engagement’ and Promotional Pop Up and Announcement Bar right underneath.

Let's start with the basic set-up of the announcement bar.
Since you likely haven’t done this before, it should say it's disabled.

1. Click the arrow and select ‘enable announcement bar’ and boom! You'll see it appear at the top of your website!
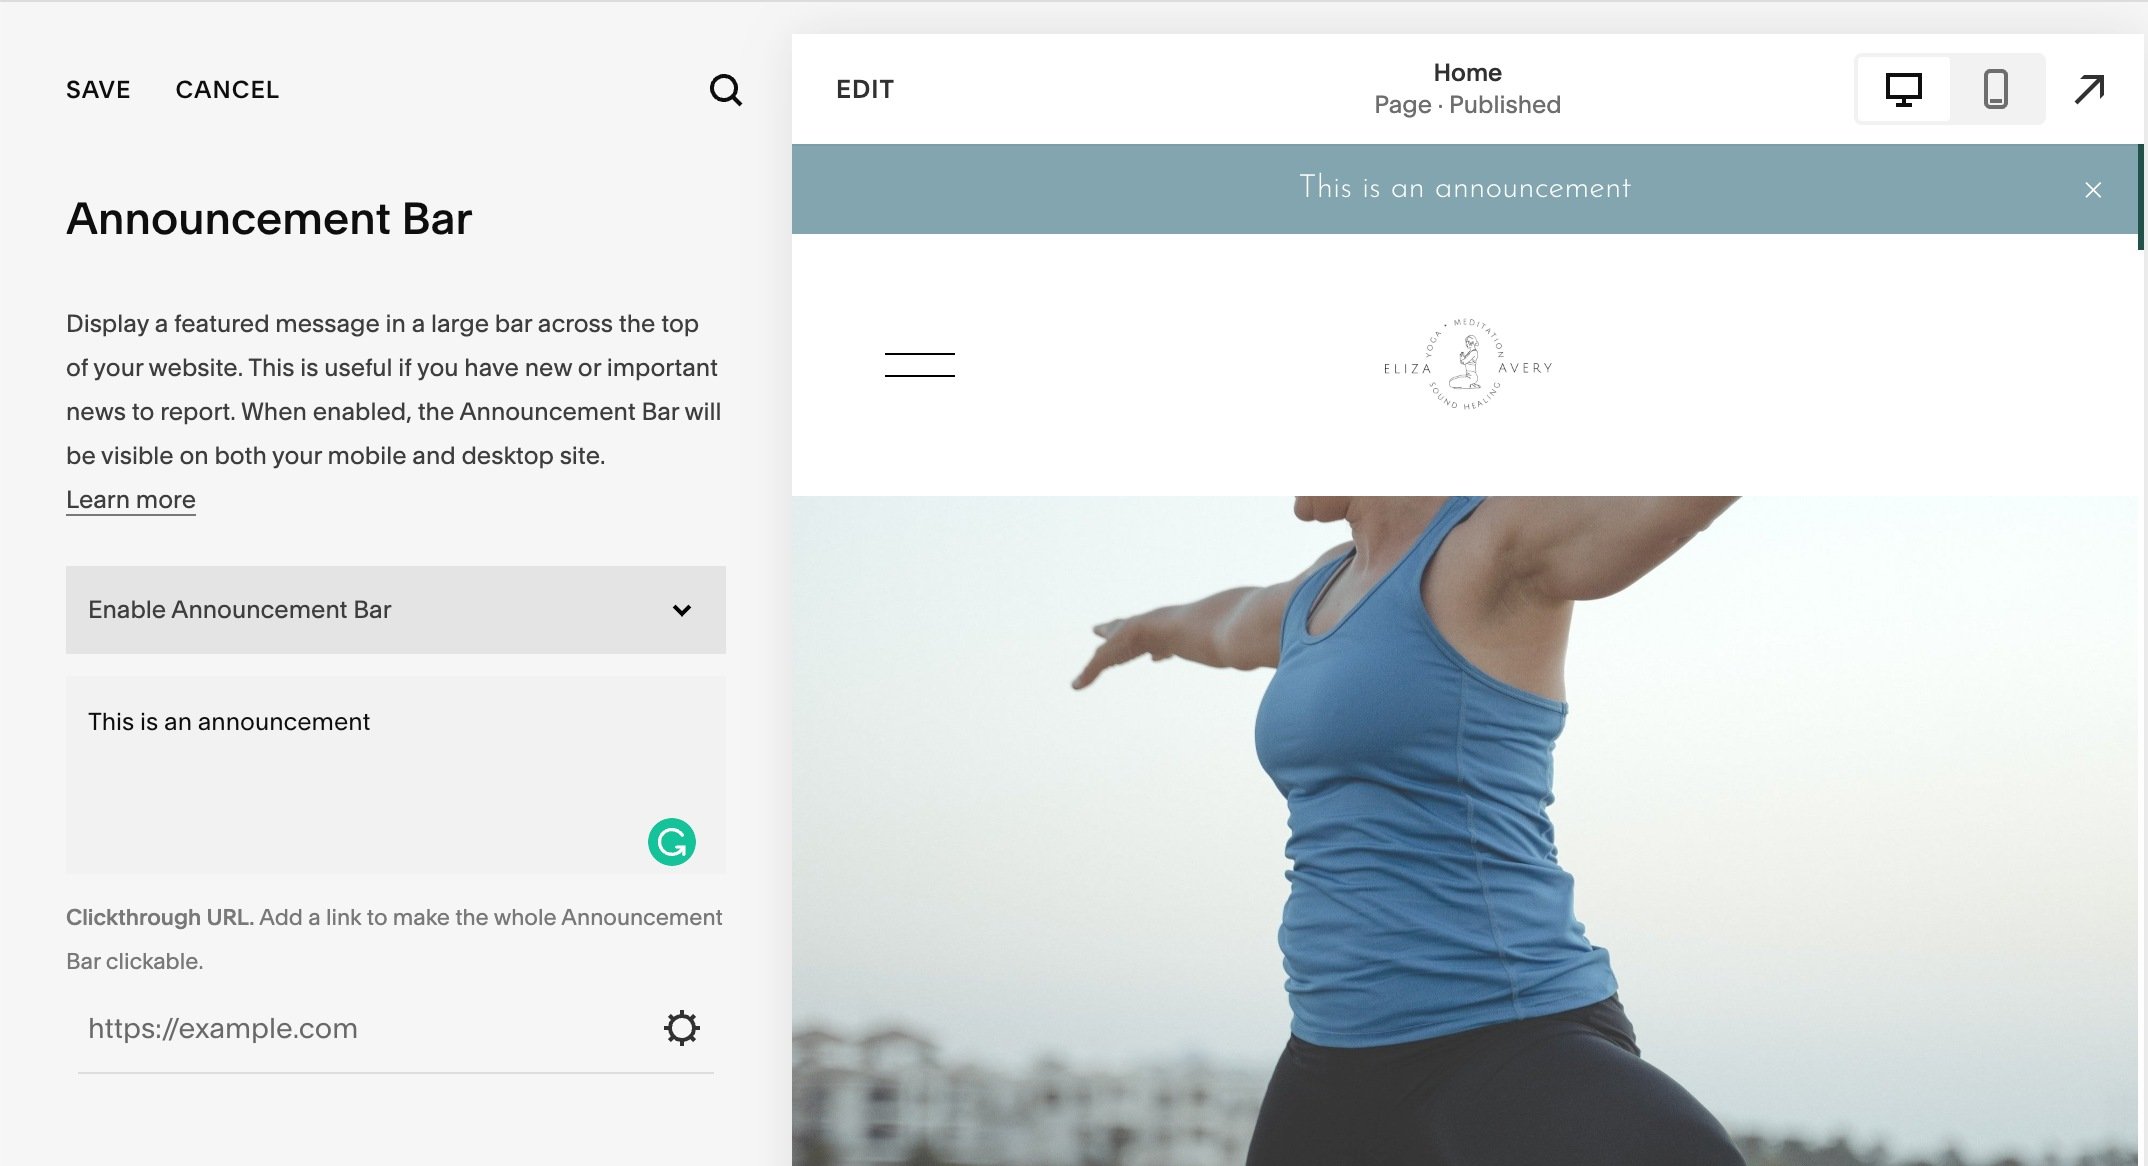
2. In your side menu, type in the text you want to appear in your announcement.

3. You can style the text just like you would any other text on your site. You can bold it. Italicize it. Underline it. Do whatever you want.
4. You can also include a link to a specific portion of your text, by highlighting the words you want to be linked and clicking on the link button.
5. Or you can make the entire announcement bar clickable by going to the next section and clicking the settings wheel. You have many options!
It can link to a specific URL (helpful, if you have a lead magnet landing page, or email sign-up with a unique URL)
Link to a file for a download you're offering people.
Set it up to send an email
Link it to a specific page on your website
Finally, you can send it to a phone number

6. HIT SAVE!!!
Now that you have the basic text and linking set up, you’re probably going to want to give it some pizazz! Make it stand out with styling!
So how do you style it?
1. Go back to your main navigation menu and select ‘Design’

2. Select ‘Site styles’.

3. The style menus will appear on the right of your screen.

4. Select ‘Colors’ and then your first palette. (Lightest 1 in this example)


5. Go to the top of your website and click on the announcement bar.

6. It’s automatically going to bring up the format options for the announcement bar only! 🤯
1. This is a really cool trick and very handy. It saves you a lot of time scrolling through everything to find the announcement bar options. And, we’ll use this trick again with pop-ups!
7. Choose the background color and text color for your bar. You can use something from your palette, or go crazy and use a custom color.

8. HIT DONE and SAVE!!!
And just like that, your announcement bar is live and ready to grab visitors’ attention!
Now let's go take a look at how to do a promotional popup
How to Add and Style a Promotional Pop-Up
1. Navigate back to the ‘Marketing’ menu
2. Select ‘Promotional Pop up’.
3. Don’t toggle it on yet. Format and Style it first!

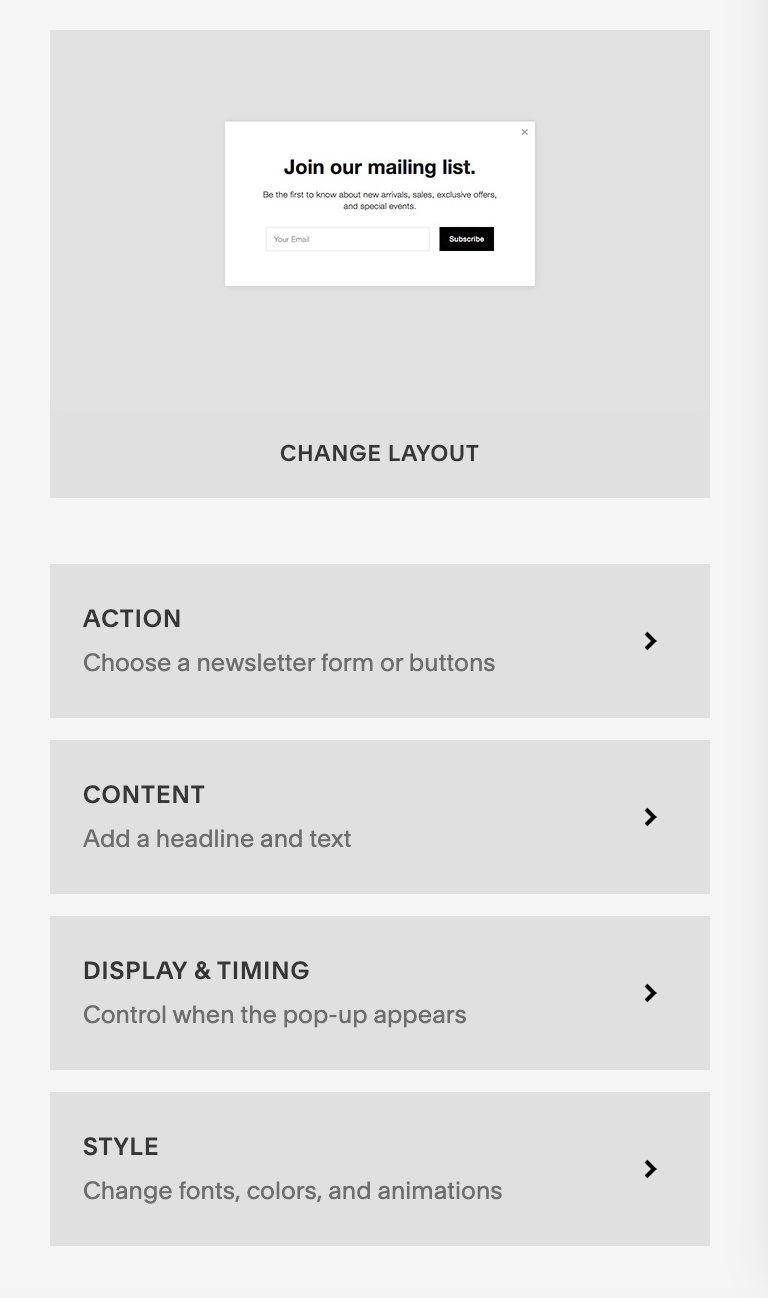
4. You'll see right away, you get a lot of options here. So let's just start with choosing the layout.
5. Select ‘Change Layout’ and several options will appear (scroll through as there are many more than shown in the image below).

6. Go ahead and click each one to see what they are and how they will look on your site.
7. Choose the one you want to use.
1. If you choose a layout with an image, you’ll see a separate box appear in the left-hand menu where you’ll be prompted to upload your image.
8. Choose your action. This is where you're going to choose whether they’re going to click a button or sign up for a newsletter.
1. Note: Newsletter is if you're using Squarespace campaigns or MailChimp or connecting to a Google Drive. This is just like the newsletter block. So if you select sign up for a newsletter, it's going to prompt you to input all the necessary information exactly like a newsletter block.

9. Select click a button

10. In the box you can write the text you want to appear in the button. (You’ll see it update as you write it).
11. In the next box you set what you want to happen when they click that button.
1. Link to a URL
2. Send an email
3. Link to a file
4. Link to a page on your website
5. Link to a phone number
12. HIT SAVE!!
That takes care of your action and now it’s time to add your content.
Content is your headline and body text.

Type the headline and body text you want to use into their respective boxes.
Hit SAVE!
Next, you want to set the display and timing. This will dictate where and when this popup will show up.

Choose which page(s) you want it to pop up on
Choose ‘any first page’ if you want it to show up on any page a visitor lands on the first time they come to your site.
Choose ‘only certain pages’ if you only want it to show up on specific pages. You’ll be shown a menu of all the pages you can select.
On to timing.
Choose the timing your pop up will use
‘Show on a timer’ will allow you to choose the number of seconds a visitor is on your site before it pops up.
‘Show on scroll’ will allow you to choose at what percentage it will show up. (e.g. it will show up after someone has scrolled down 25% of the page).
Or you can choose a ‘combination of both’. Here you can set both a time and a percentage setting. (e.g. pop up after 10 seconds or when they’ve scrolled down 25%, whichever comes first.)
Next up is frequency.
Here you select how many days after they first see the popup, you show it to that visitor again. Options are:
The next day
One week
Two weeks
30 days
Never.
If you've done a newsletter sign-up. You can choose whether to show it again if they've already signed up.
Cool feature alert!: You can also choose whether or not you show the pop-up on mobile.
Once you've made all your selections - hit save.
The last thing to do is style your pop-up!
Unlike the announcement bar, you don’t have to go out to site styles to do this. You can update the styles within the pop-up menu.

But first, another quick tip!
You’ll notice that there are a ton of things to select from in the style menu, but we can do the same thing that we did with the announcement bar.

Go into the pop-up and click on the headline and the style menu on the left will automatically only show options for the headline, font, and color.
You can style it for desktop and mobile.
Repeat the above two steps for the body text, and then the button.
If you ever want to see all options, just click on ‘show all’ in the upper right corner of the menu.
If you want to change the background color on your pop-up this is the quick way to get back to that option in the menu, since clicking on the background doesn’t work for this as it does for the text.
4. Don’t forget to hit Save!!!
Yeah, I know. I harp on the ‘hit save’, but it’s a habit that will save you heartache!
Once you're done setting your styles, you can go back up to the top of the menu and toggle the pop-up on!

One nice thing is even if you toggle it off, it will save whatever you did last. For example, this is great if you promote a sale or event once a quarter. You can just toggle the pop-up on and off. Make a few tweaks if necessary, but you don’t have to recreate it every time.
Let’s Wrap This Up!
I hope you found that tutorial helpful. As you can see, these are two great built-in marketing tools Squarespace offers that only take a few minutes to set up. Whether you choose a popup, an announcement bar, or both, you can highlight important things on your website whenever you want without spending any money on special software.


